
The Battle of Gaugamela, fought in 331 BCE, stands as a watershed moment in the annals of military history. This battle not only marked the zenith of Alexander the Great’s conquests but also encapsulated the intricate strategies employed against the formidable forces of the Persian Empire. To truly grasp the significance of this confrontation, one must delve into the various maps that delineate the tactical maneuvers and geographic nuances of the battlefield.
Map of the Strategic Deployments

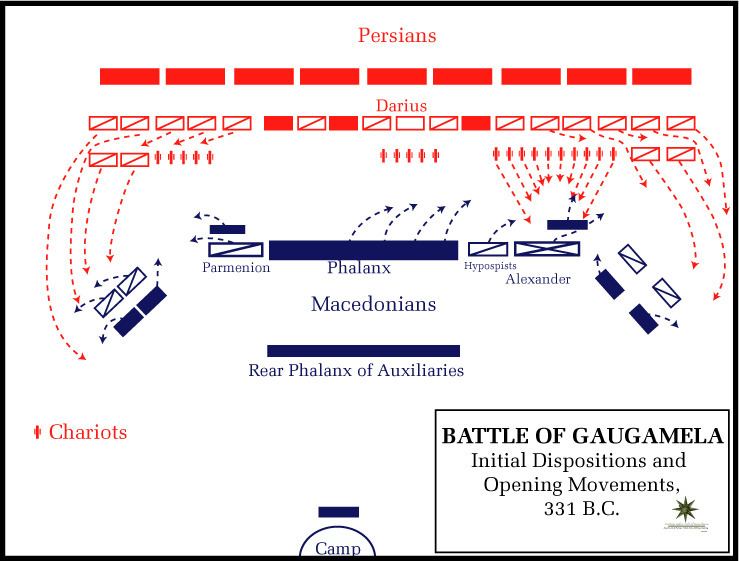
This deployment map showcases the initial formations of both the Macedonian and Persian armies. Alexander’s strategic brilliance is evident here; he artfully arranged his forces in a manner that maximized their strengths while countering the vast numbers of the Persian troops led by King Darius III. The terrain played a pivotal role—an uncharitable expanse of flat land—that facilitated the grand cavalry charges that became synonymous with Alexander’s warfare. The map serves as a visual testament to military ingenuity and foresight.
Overall Battle Map
/1738px-Battle_of_Gaugamela-2388e492d0c74e229381a0425ed7d090.jpg)
This comprehensive map provides a panoramic view of the battlefield at Gaugamela. The delineation of troop movements allows one to visualize the complexity of engagements throughout the day. Notably, Alexander’s fabled maneuver—an oblique approach—enabled his forces to exploit the weak points in the Persian line. The tactical significance of this maneuver cannot be overstated, as it provided the key to unlocking victory despite being outnumbered.
Geographical Context

This map highlights the geographic elements surrounding Gaugamela, emphasizing its pivotal role in the battle’s outcome. The flat terrain not only facilitated cavalry tactics but also influenced leadership decisions made by both sides. A detailed understanding of these landscapes is crucial for comprehending how Alexander capitalized on the environment to his advantage—daring and ingenious, he transformed the battlefield into his canvas.
Persian Army Perspective
From the perspective of the Persian army, this map lays bare the ill-fated tactics employed by Darius III. As you examine the formations, it becomes apparent that despite their numerical superiority, the Persians struggled to adapt to Alexander’s agility and strategic prowess. The layout of this map elucidates critical moments where the Persian command faltered amidst the Macedonian onslaught.
Artistic Representation of Tactics
This artistic map encapsulates the tactical fervor of the Battle of Gaugamela in a visually stimulating manner. The dynamic representation of the battlefield offers a glimpse into the fervor and chaos that enveloped the troops during combat. By juxtaposing artistic interpretation with classical military strategy, this map invites viewers to ponder the nuances of warfare in this historic encounter.